Battery switch on travel trailer function is crucial for managing your RV’s power. Understanding how it works – from selecting the right switch to troubleshooting problems – is key to a smooth and safe camping experience. This guide covers everything from the different types of switches available to essential maintenance tips, ensuring you’re equipped to handle any power situation on the road.
We’ll explore the various types of battery switches, their pros and cons, and how they control power flow between your house batteries and chassis battery. We’ll also delve into troubleshooting common issues, provide wiring diagrams, and offer step-by-step instructions for installation and maintenance. By the end, you’ll be confident in managing your travel trailer’s power system.
Battery Switch Types in Travel Trailers

Choosing the right battery switch for your travel trailer is crucial for managing your power sources effectively and preventing potential electrical problems. Understanding the different types available will help you make an informed decision based on your specific needs and setup. This section details the common types, their advantages, and disadvantages.
Battery Switch Types
Travel trailers utilize various battery switches to control the flow of power from your batteries to the trailer’s electrical system. The most common types are single-pole, double-pole, and double-pole double-throw switches. Each offers different levels of control and safety.
Single-Pole Battery Switches, Battery switch on travel trailer function
A single-pole switch controls only one circuit. In a travel trailer context, this typically means it controls the power from one battery bank to the trailer’s 12-volt system. This is the simplest type of switch.
So, you’re an audiophile who travels? Awesome! Check out this guide on setting up your audiophile travel setup for the best sound on the go. It’s all about packing light but smart. Then, before you jet off, remember to sort out your travel insurance! Getting Aon travel insurance gives you peace of mind knowing your gear is covered in case of mishap.
Enjoy your travels and your amazing music!
Double-Pole Battery Switches
Double-pole switches control two circuits simultaneously. In a travel trailer setup, this usually means controlling both positive and negative leads from one battery bank to the trailer’s 12-volt system. This provides a more complete disconnect, improving safety.
Double-Pole Double-Throw (DPDT) Battery Switches
A DPDT switch allows you to select between two different sources of power. For example, you could switch between your house batteries and a generator or shore power. This offers the greatest flexibility.
Comparison of Battery Switch Types
| Type | Description | Advantages | Disadvantages |
|---|---|---|---|
| Single-Pole | Controls one circuit (usually positive lead). | Simple, inexpensive. | Less safe than double-pole options; doesn’t offer complete disconnect. |
| Double-Pole | Controls two circuits (positive and negative leads from one source). | Safer than single-pole, provides complete disconnect. | Less flexible than DPDT switches. |
| Double-Pole Double-Throw (DPDT) | Allows switching between two different power sources. | Most flexible, allows switching between battery banks or external power. | More complex, potentially more expensive. |
Functionality of a Battery Switch: Battery Switch On Travel Trailer Function
A battery switch in your travel trailer is a crucial component for managing power flow from your trailer’s batteries, ensuring you can utilize your house batteries (powering interior lights, appliances, etc.) and your chassis battery (powering engine starting) independently and safely. It’s essentially a master control that allows you to connect and disconnect these batteries as needed, preventing unwanted battery drain and protecting your electrical system.The primary function of a battery switch is to isolate the house batteries from the chassis battery.
This isolation is vital for several reasons. Firstly, it prevents the house batteries from draining the chassis battery, ensuring you always have enough power to start your tow vehicle. Secondly, it safeguards against potential electrical shorts or issues in your house battery system from affecting your vehicle’s starting capability. Finally, it allows for selective charging of either battery bank independently.
For example, you can charge your house batteries while parked at a campsite without affecting the chassis battery.
Battery Switch Isolation and Power Flow
The switch typically operates in several positions. A common configuration includes “Both,” “Off,” “House,” and “Start” positions. In the “Both” position, both the house and chassis batteries are connected together, allowing for combined power usage and charging. The “Off” position completely disconnects both batteries, preventing any power flow. The “House” position connects only the house batteries to the trailer’s electrical system, allowing you to use the trailer’s power while leaving the chassis battery untouched.
The “Start” position connects only the chassis battery to the vehicle’s starting system. Understanding these positions is essential for safe and efficient battery management.
So, you’re an audiophile who travels? Awesome! Check out this guide on creating the perfect audiophile travel setup to ensure your ears are always happy on the road. It’s crucial to protect your investment, and while you’re at it, securing comprehensive travel insurance is just as important. Consider getting a quote from Aon travel insurance for peace of mind during your adventures.
That way, you can focus on enjoying your amazing music and your trip without worrying about unexpected issues.
Safe Operation of a Battery Switch
Before operating your battery switch, always ensure the vehicle’s engine is off and the trailer’s power is disconnected from any external power sources (like shore power). This prevents accidental electrical shocks or damage to the electrical system.
- Identify the switch: Locate your battery switch. It’s usually found near the batteries themselves, often in a compartment under the trailer or in the tow vehicle’s engine bay.
- Check the position: Note the current position of the switch. This will help you understand the existing connections.
- Select the desired position: Carefully turn the switch to the desired position (“Both,” “Off,” “House,” or “Start”). Make sure to move it smoothly and firmly to ensure a secure connection.
- Verify the connection: After changing the switch position, double-check the connections by testing the appropriate electrical circuits (e.g., turning on interior lights to verify house battery connection).
- Monitor battery levels: Regularly monitor the voltage levels of both your house and chassis batteries to ensure proper charging and avoid deep discharge. Low voltage can damage batteries and impact performance.
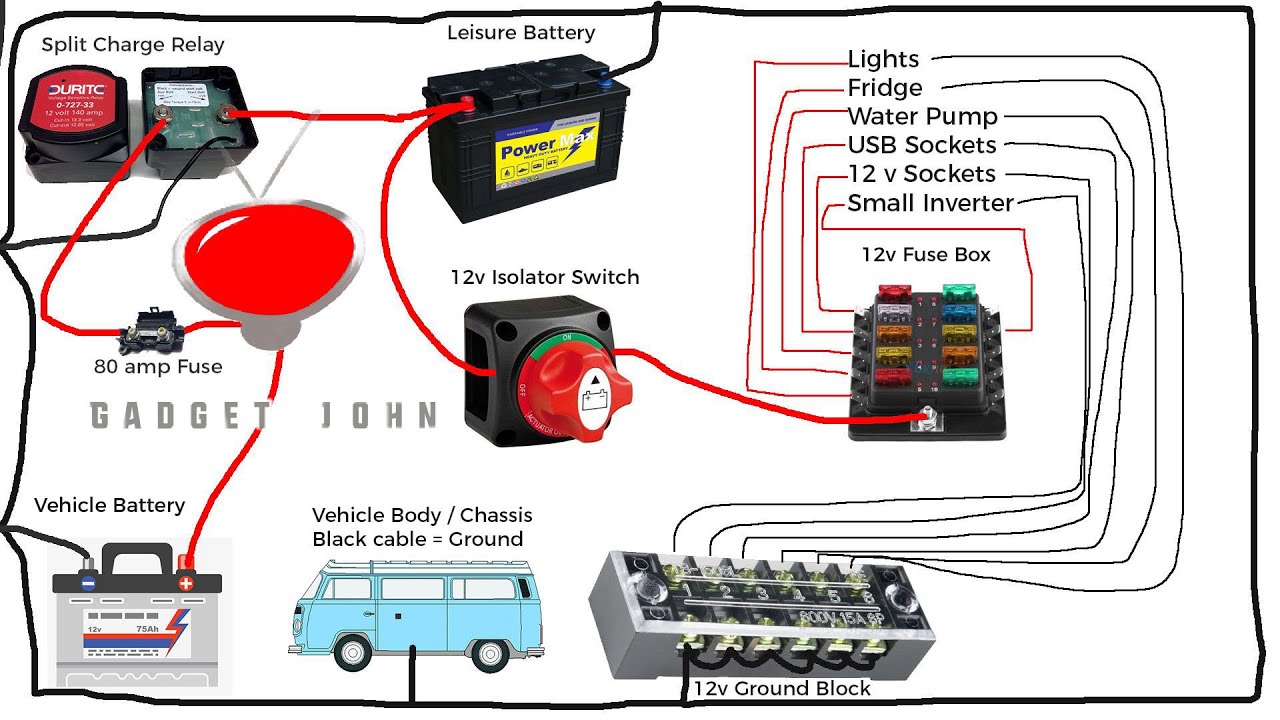
Wiring Diagrams and Connections
Understanding how your travel trailer’s battery system is wired is crucial for safe and reliable operation. A clear wiring diagram helps troubleshoot problems and ensures proper connections. Different battery switch configurations require different wiring approaches, so it’s important to know your setup.Different wiring diagrams exist depending on the number of batteries and the type of battery switch used.
A simple system might only involve a single battery and a basic disconnect switch, while more complex setups include multiple batteries, a battery combiner, and a sophisticated switching system. These diagrams visually represent the flow of electricity, indicating the positive and negative terminals, the switch locations, and any other relevant components. Accurate diagrams are essential for any modifications or repairs to your system.
Simple Two House Battery and One Chassis Battery Wiring Diagram
This example depicts a common setup: two house batteries (for living space appliances) and one chassis battery (for starting the tow vehicle). A battery switch manages power to the house batteries. We’ll use a table to represent the diagram clearly. Remember, always disconnect the negative terminal first when working with batteries.
| Component | Positive (+) Connection | Negative (-) Connection |
|---|---|---|
| Chassis Battery | Chassis Electrical System | Chassis Ground |
| House Battery 1 | Battery Switch (In position 1 or Both) | Negative Bus Bar |
| House Battery 2 | Battery Switch (In position 2 or Both) | Negative Bus Bar |
| Battery Switch | Positive Bus Bar (from Chassis Battery or Solar Charger) | Negative Bus Bar |
| Positive Bus Bar | 12V Appliances & Converter | – |
| Negative Bus Bar | – | 12V Appliances & Converter/Chassis Ground |
| Solar Charger (Optional) | Battery Switch or Positive Bus Bar | Negative Bus Bar or Chassis Ground |
Note: The “Both” position on the battery switch connects both house batteries in parallel. The negative bus bar provides a common ground point for all house battery related circuits. Always ensure appropriate fuse protection on all circuits. This diagram is a simplified representation and may need adjustments based on specific trailer components and manufacturer’s recommendations. Consult a qualified electrician if you are unsure about any aspect of your wiring.
Battery Switch Selection and Installation
Choosing and installing the right battery switch is crucial for managing your travel trailer’s power effectively and safely. A properly selected and installed switch ensures you can easily switch between your house batteries and your tow vehicle’s charging system, preventing accidental drain and maximizing battery life. This section will guide you through the selection process and the installation procedure.
Factors to Consider When Selecting a Battery Switch
Selecting the correct battery switch involves considering several key factors to ensure compatibility and sufficient capacity for your travel trailer’s electrical system. The most important considerations are the amperage rating and the number of batteries you need to manage. Amperage ratings should exceed the maximum current draw of your trailer’s appliances to avoid overheating and potential damage. For multiple batteries, a switch capable of handling each battery independently is necessary.
Consider also the switch’s mounting style and the overall build quality for longevity. A high-quality switch, even if slightly more expensive, is a worthwhile investment in the long run. Always consult the manufacturer’s specifications to ensure the switch is suitable for your specific needs and the type of batteries used. For instance, a 100-amp switch is suitable for most travel trailers with a single 12-volt battery system, while larger systems with multiple batteries may require a 200-amp or even higher rated switch.
Step-by-Step Guide for Installing a Battery Switch
Installing a battery switch requires careful attention to detail and adherence to safety procedures. Incorrect installation can lead to electrical hazards or damage to your equipment. This process Artikels a general approach; always consult the specific instructions provided with your chosen battery switch.
- Disconnect the Battery: Before beginning any work, disconnect the negative terminal of your battery to prevent accidental shocks or short circuits.
- Choose the Mounting Location: Select a location that is easily accessible, well-ventilated, and protected from the elements. A secure location near the battery is generally ideal.
- Prepare the Wiring: Measure and cut the necessary lengths of appropriately sized wiring. Use appropriately sized wire connectors to join the wires to the switch terminals. Ensure the wire gauge is sufficient to handle the current your system draws.
- Mount the Switch: Securely mount the battery switch to the chosen location using the provided hardware. Ensure a firm and stable mounting to prevent vibration or accidental dislodgement.
- Connect the Wiring: Connect the wires to the appropriate terminals of the battery switch according to the wiring diagram included with the switch. Typically, you’ll have connections for each battery and for the main power feed to your trailer’s electrical system.
- Reconnect the Battery: Once all connections are secure, reconnect the negative battery terminal.
- Test the Switch: Thoroughly test the switch to ensure it functions correctly and that all circuits are properly isolated when the switch is in the off position.
Tools and Materials Required for Installation
Proper tools and materials are essential for a safe and successful installation. Using the wrong tools or inadequate materials can compromise the safety and effectiveness of the installation.
- Battery switch of appropriate amperage rating
- Wrench or socket set for battery terminals
- Wire strippers/cutters
- Crimping tool
- Wire connectors (appropriately sized)
- Appropriate gauge wiring
- Screwdriver (appropriate type for mounting hardware)
- Drill (if necessary for mounting holes)
- Safety glasses
- Work gloves
Mastering your travel trailer’s battery switch is a significant step towards RV independence. From understanding its function to performing basic maintenance, this knowledge empowers you to troubleshoot problems quickly and safely. Remember, regular checks and preventative maintenance are your best allies in avoiding costly repairs and ensuring worry-free adventures. Happy travels!
Frequently Asked Questions
What size battery switch do I need?
The correct amperage rating depends on your battery bank’s total amperage. Consult a qualified electrician or your RV’s manual for guidance.
How often should I clean my battery switch terminals?
At least once a year, or more frequently if you notice corrosion. Clean them with a wire brush and baking soda solution.
Can I use a battery switch to disconnect my solar panels?
No, a battery switch is not designed to handle the high voltage of solar panels. You’ll need a separate disconnect switch for your solar system.
What happens if my battery switch fails?
A failed switch can prevent you from using your house appliances, potentially leaving you without lights or refrigeration. It can also lead to battery drain or even a fire hazard if connections are faulty.
